
Connect Windows XP or 2000 to the Network
Follow these steps below to bring the internet to your Windows XP or Windows 2000 desktop.
STEP 1 : Connect Hardware and System Properties
Plug one end of your network cable into your PC's ethernet jack and the other end into the
network jack in the wall. If it's not on already, start up your PC.
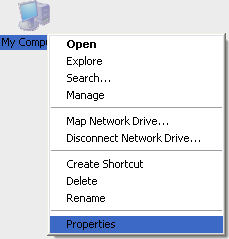
Locate the My Computer icon on your desktop (or click on Start and find My Computer there).
Right click My Computer, then click Properties from the pop-up menu. The Systems
Properties window will appear.
STEP 2 : Device Manager Window
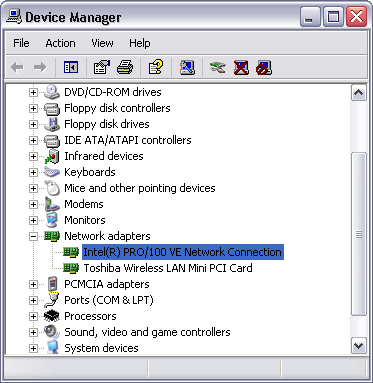
Click the Hardware tab on the Systems Properties window. Click the Device Manager
button. Look for the Network adapter option and click its +/- box (see illustration in
upper right). When it branches out, look for your network card by name. (Your network card
name may differ from the one pictured.) Ignore the Dial-up adapter if it's listed. Make
sure the card is there by name and does not have a yellow triangle icon on it. If
so, go to Step 3.
However, if your Network adapters card:
- Shows up by name with the yellow triangle, or
- Is not listed under Network adapters, or
- The Network adapters option doesn't appear at all
then your Windows has not correctly configured the card.
Please contact our technical support for further assistance.
STEP 3 : Network Connections
For 2000, close the Device Manager window and click OK to return to the desktop.
2000 users should click Start Menu, choose Settings then Network and Dialup Connections.
For XP in Category View, select Network and Internet Connections, then click Internet
Connections. For XP in Classic View, click the Start Menu and choose Control Panel
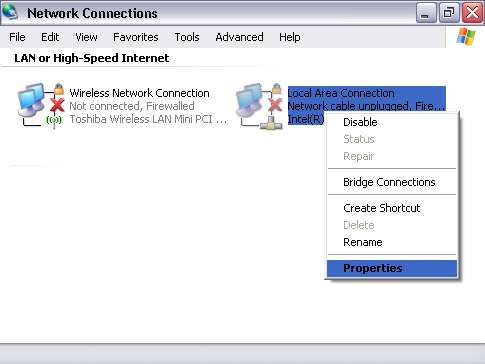
then Network Connections. Now, for 2000 or XP, double-click on Local Area Connection (or LAN).
If the Protocol list does not appear, cancel from that window and right-click on the Local
Area Connection icon and select Properties.
STEP 4 : Local Area Connection (or LAN Connection) Properties
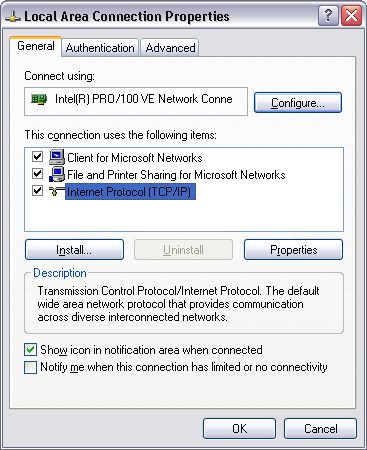
The Local Area Connection or LAN Connection window will appear. In the General tab, a
list of network components will appear. If Internet Protocol (TCP/IP) appears in the
installed components list, you're ready to go to Step 5: Internet Protocol (TCP/IP) Properties.
If Internet Protocol (TCP/IP) does not appear in the installed components list, then complete the following steps:
- Click Install button
- Select Protocol icon
- Click Add button
- Select TCP/IP icon
- Click OK button
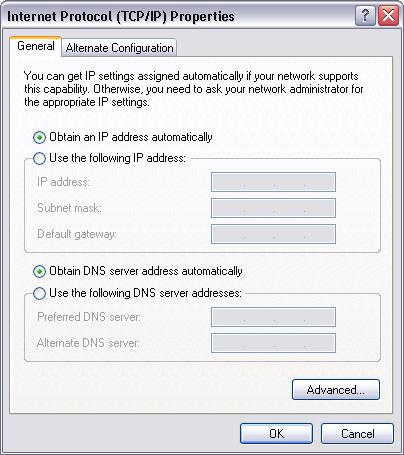
STEP 5 : Internet Protocol (TCP/IP) Properties
Select Internet Protocol (TCP/IP). Click the Properties button. In the General tab, select
"Obtain IP address automatically" and "Obtain DNS server address automatically." Click OK then
click OK in the Local Area Connection Properties window. You may be prompted to insert a Windows
disk or CD-ROM. Insert the media and click "Have Disk."
STEP 6 : Final Steps
When done, restart your computer. Test your network connection by launching a web browser such as
Internet Explorer. If you are not successful, please contact our technical support to arrange
for assistance.
|


 How to ...


